Introduction
Ever feel like you're wrestling with Git more than actually coding? Let's change that.
After contributing to many big open source projects and using git in my daily life I have been using following git commands and these commands have been my go-to tools, streamlining my development process wherever I go. Let’s dive into the Git commands you’ll ever need to boost your productivity and efficiency.
Read this post in dark mode :P
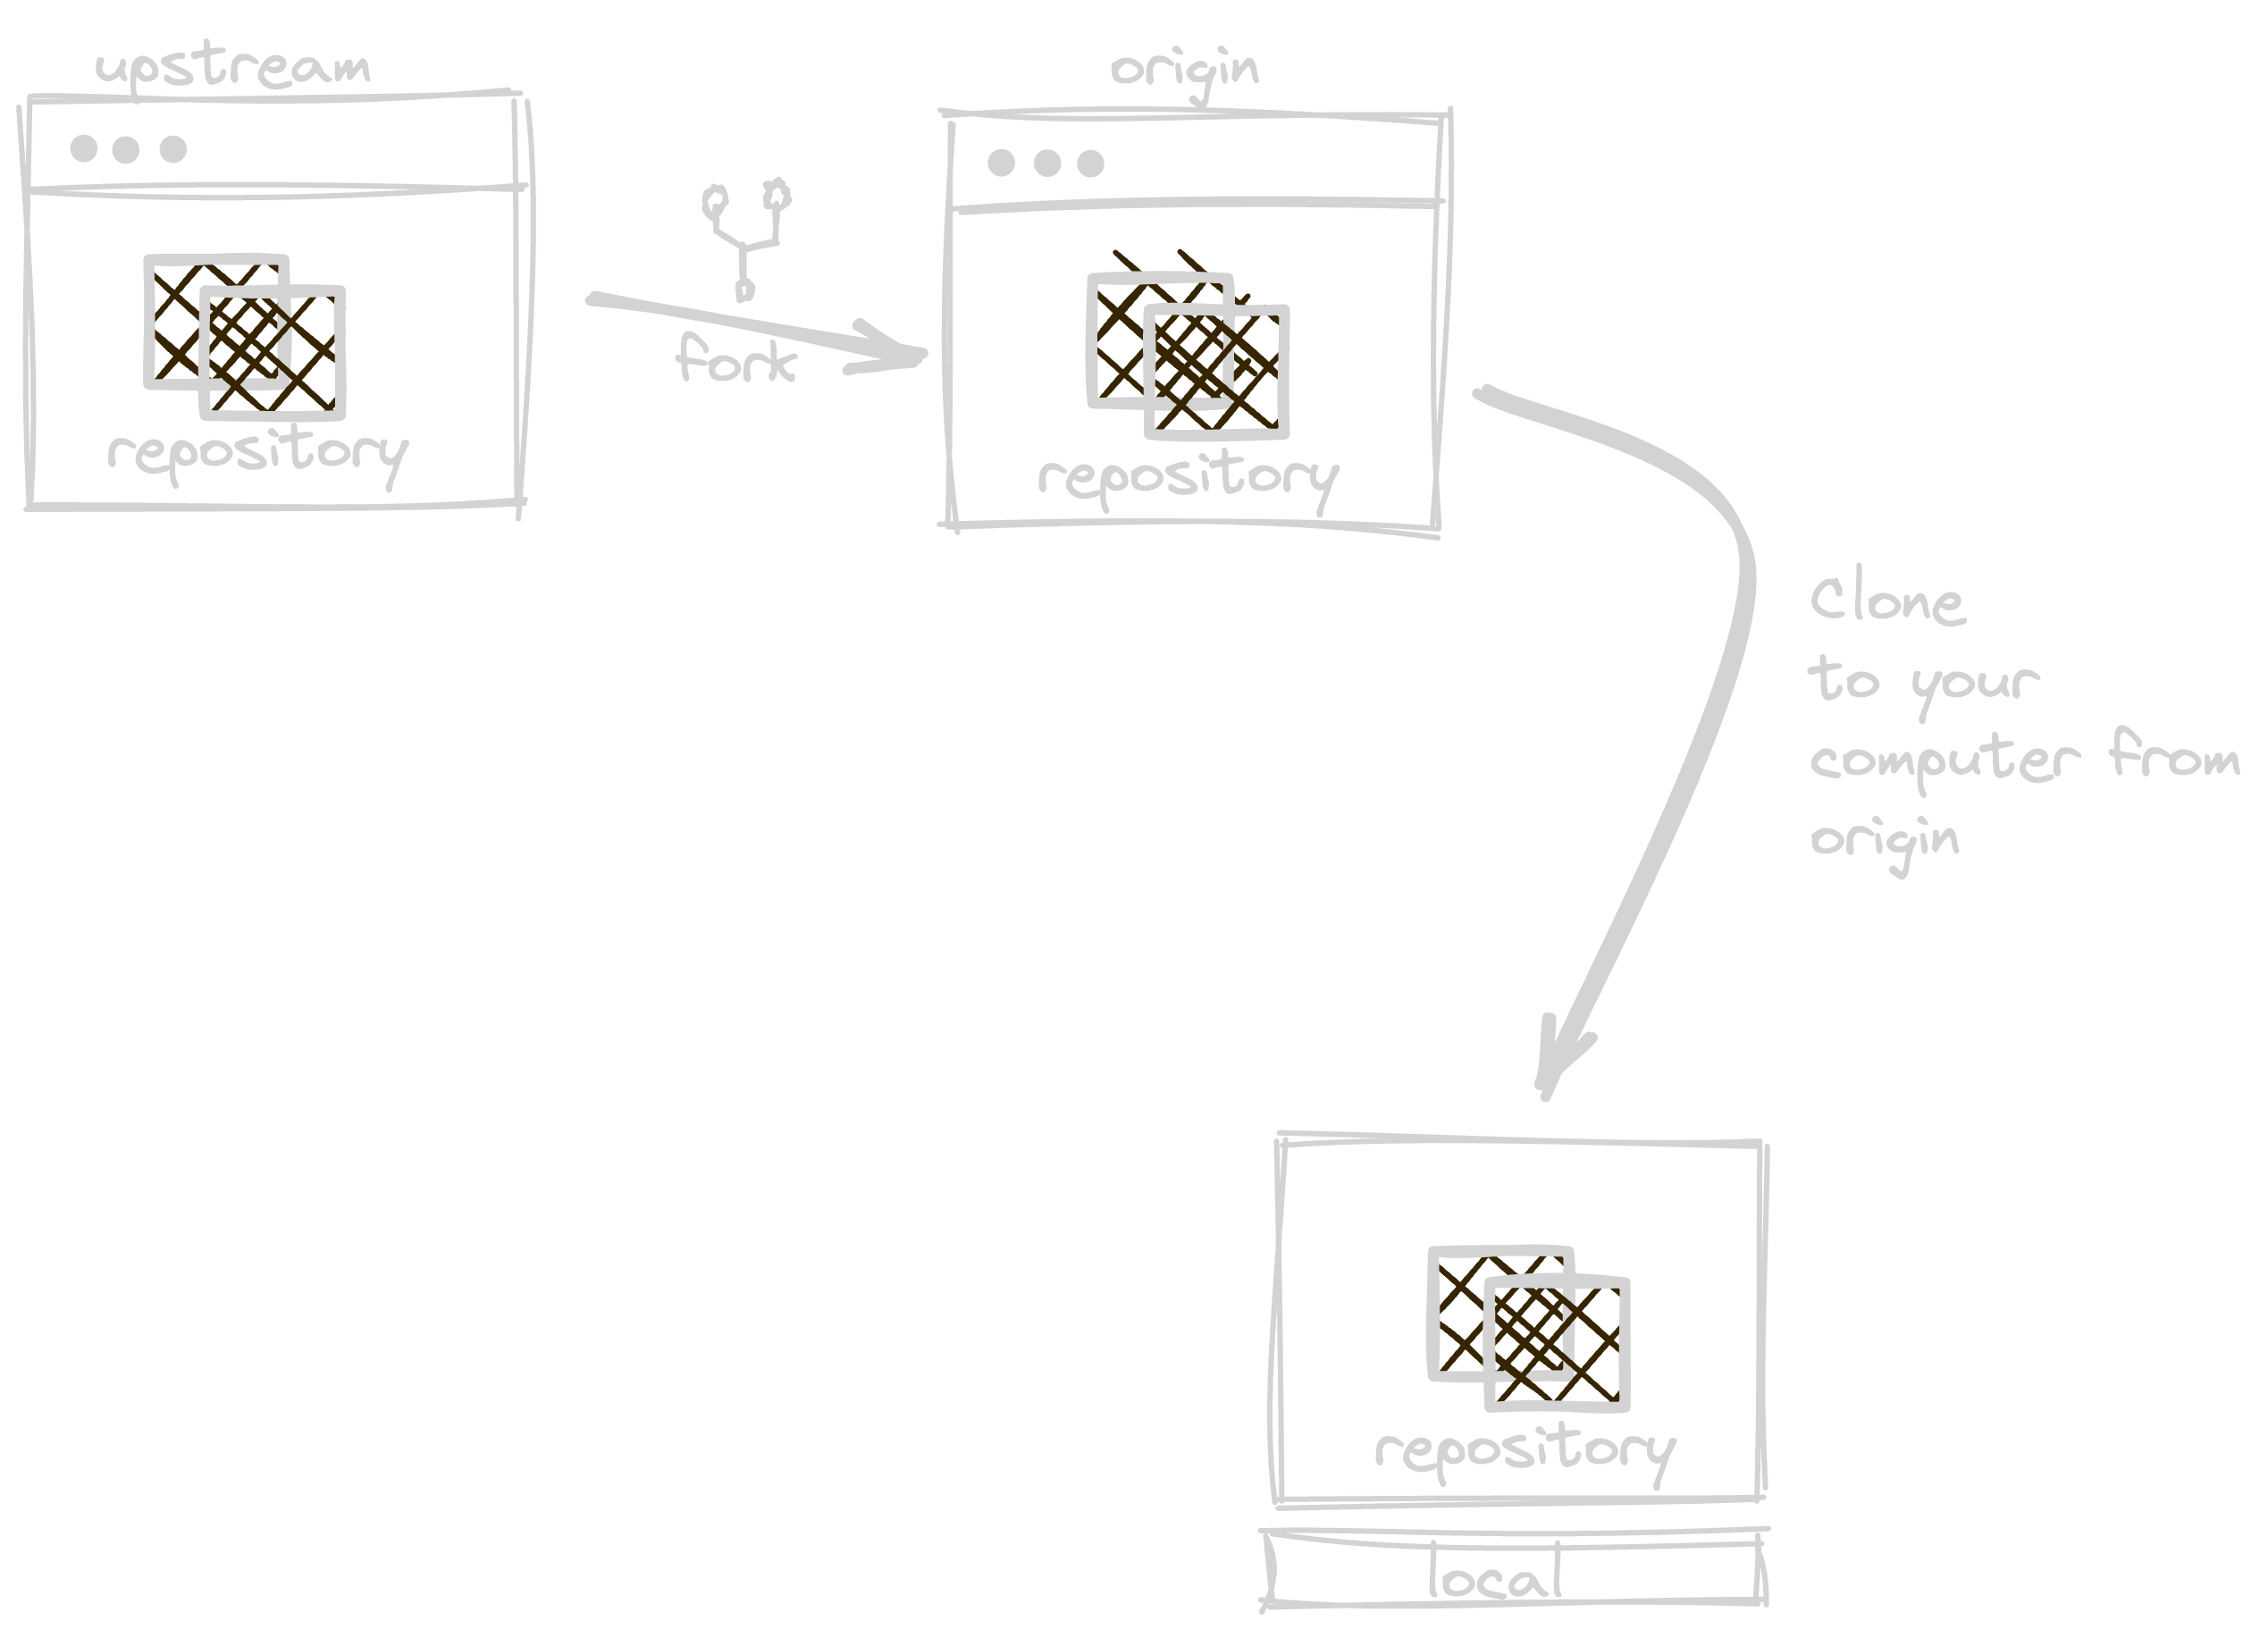
Clone
Cloning a repository means downloading a copy of the repository to your local machine. It's like saving a copy of a book to read and edit.
But unlike our usual copy and paste actions, all copies can be traced back to the original copy where it was copied from. We usually call the original
ones upstream and our forked clones origin.
git clone <repository-url>Stage/Add
Adding means selecting which changes you want to include in your next "snapshot" (commit). It's like putting the photos you want in an album.
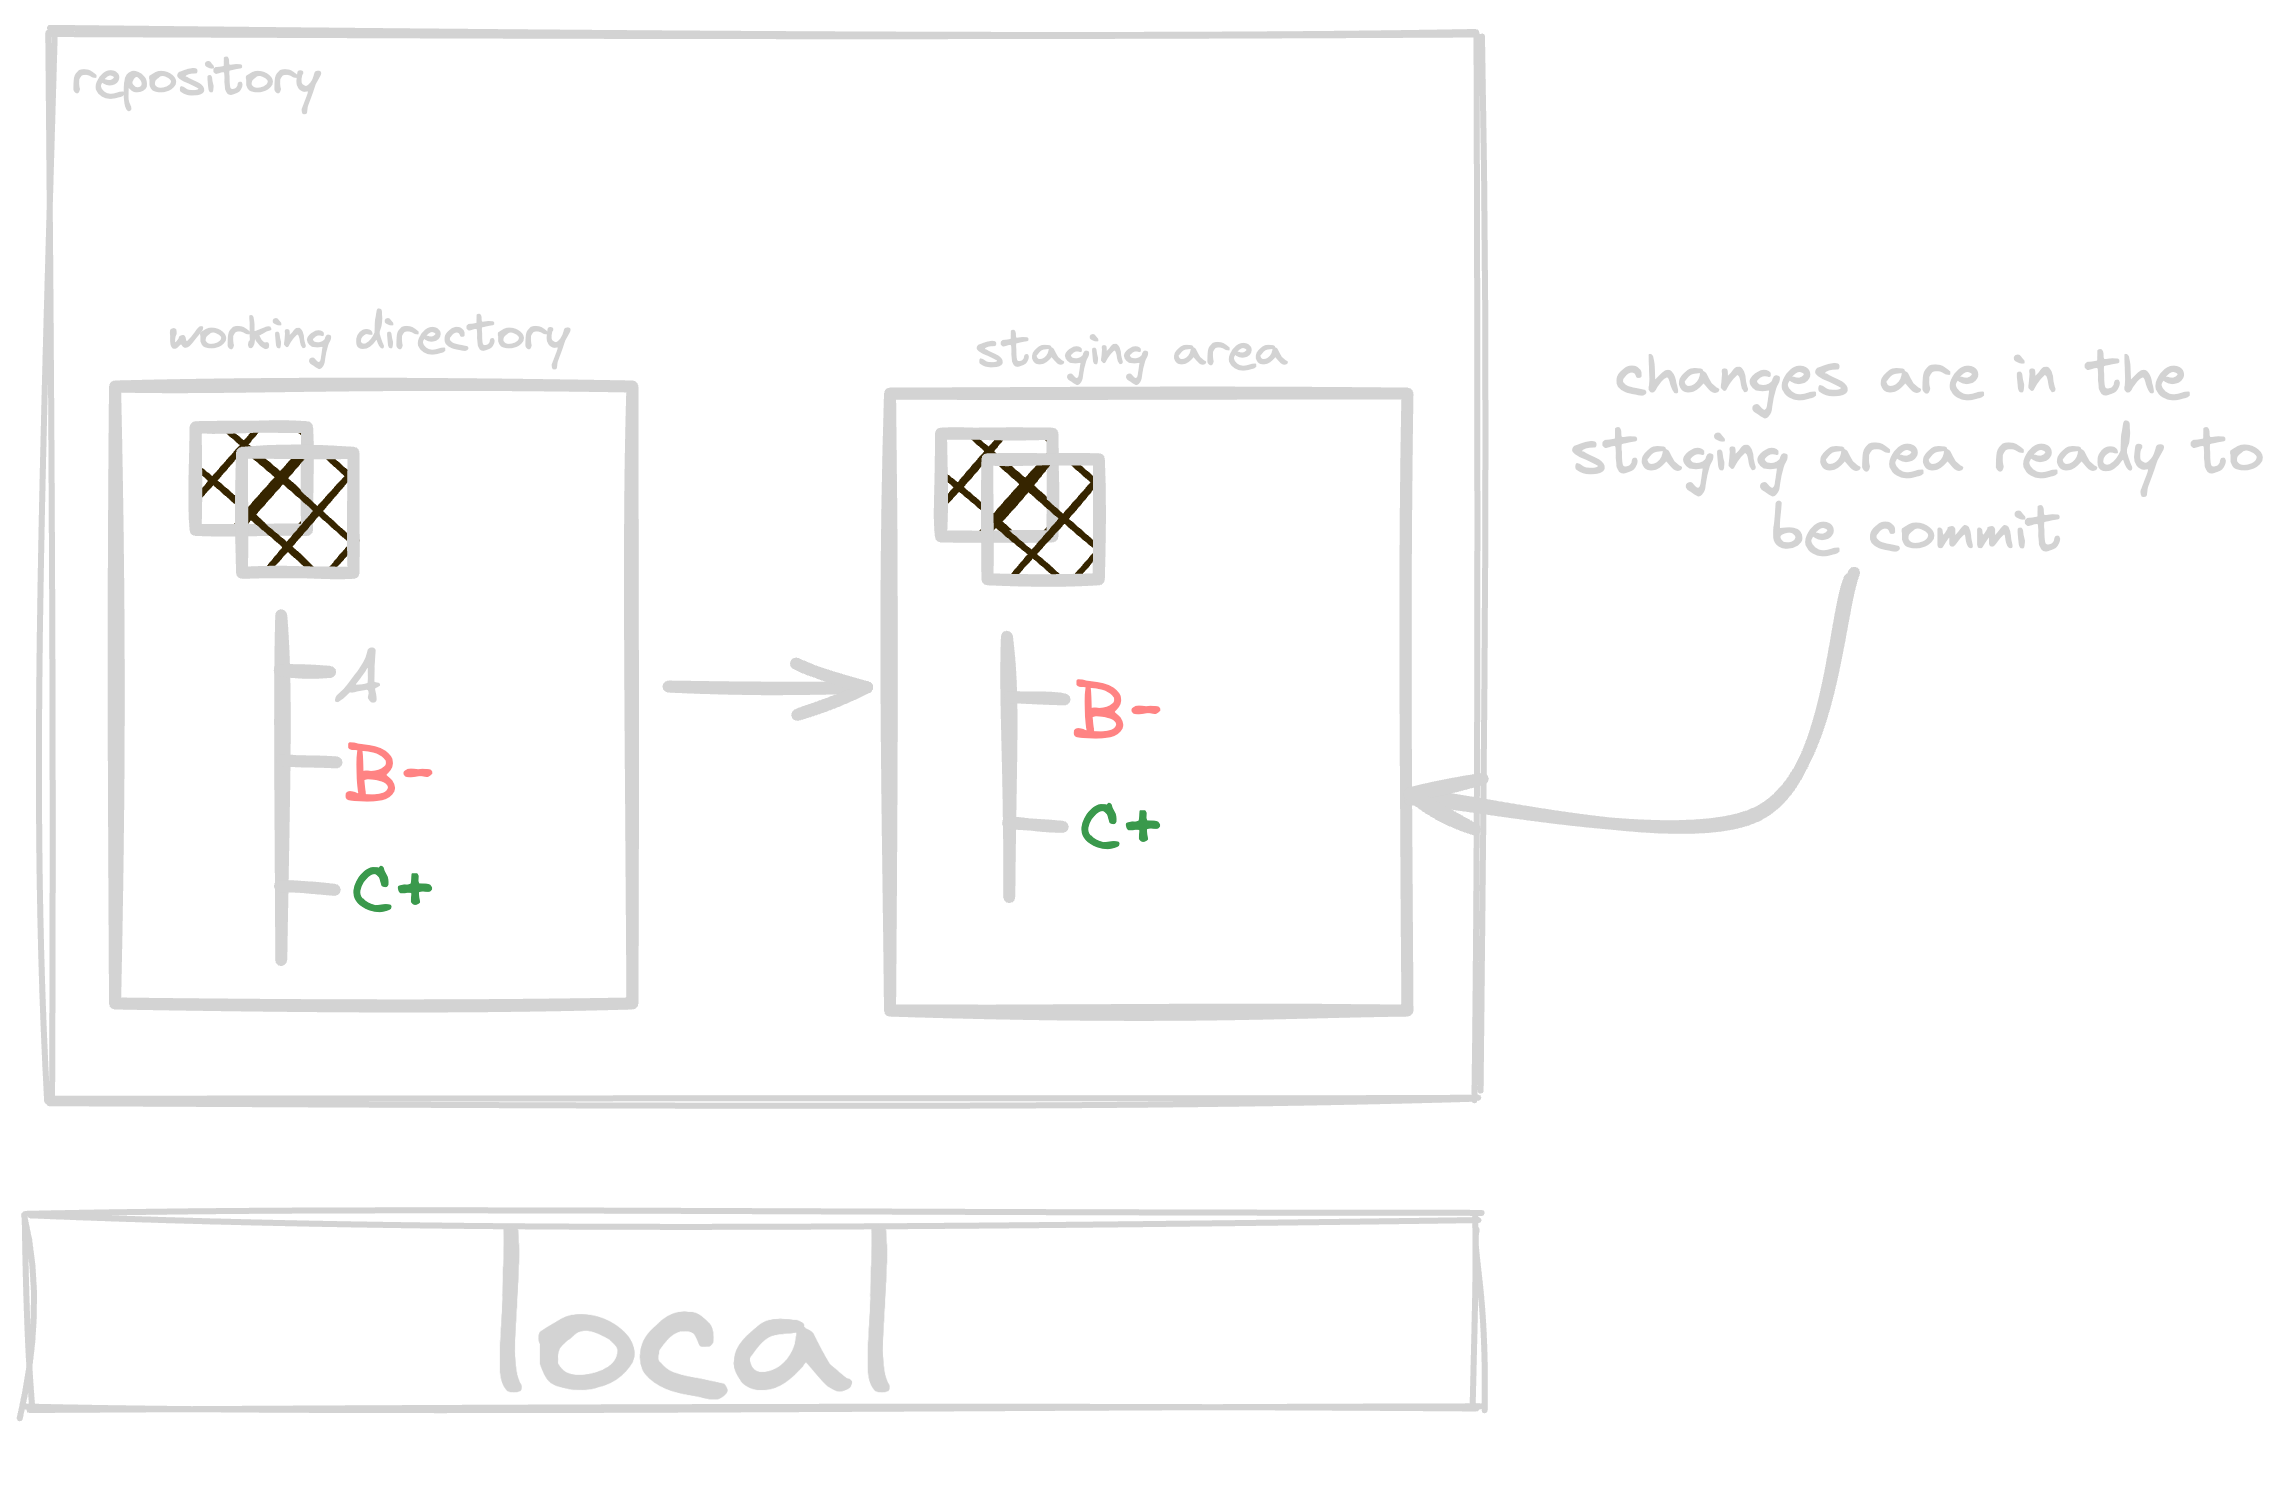
- Add specific file to the staging area
git add <file-path>- Add all the changed files to the staging area
git add -Agit add .The difference between using
git add -Aandgit add .is that the first command stages all changes in the working directory, including new, modified, and deleted files. And the later one stages new and modified files within the current directory and subdirectories but does not stage deletions.
Commit
Committing means saving a snapshot of your project at a specific point in time. Think of it as taking a picture of your project. It is used to create a snapshot of the staged changes along a timeline of a Git projects history.
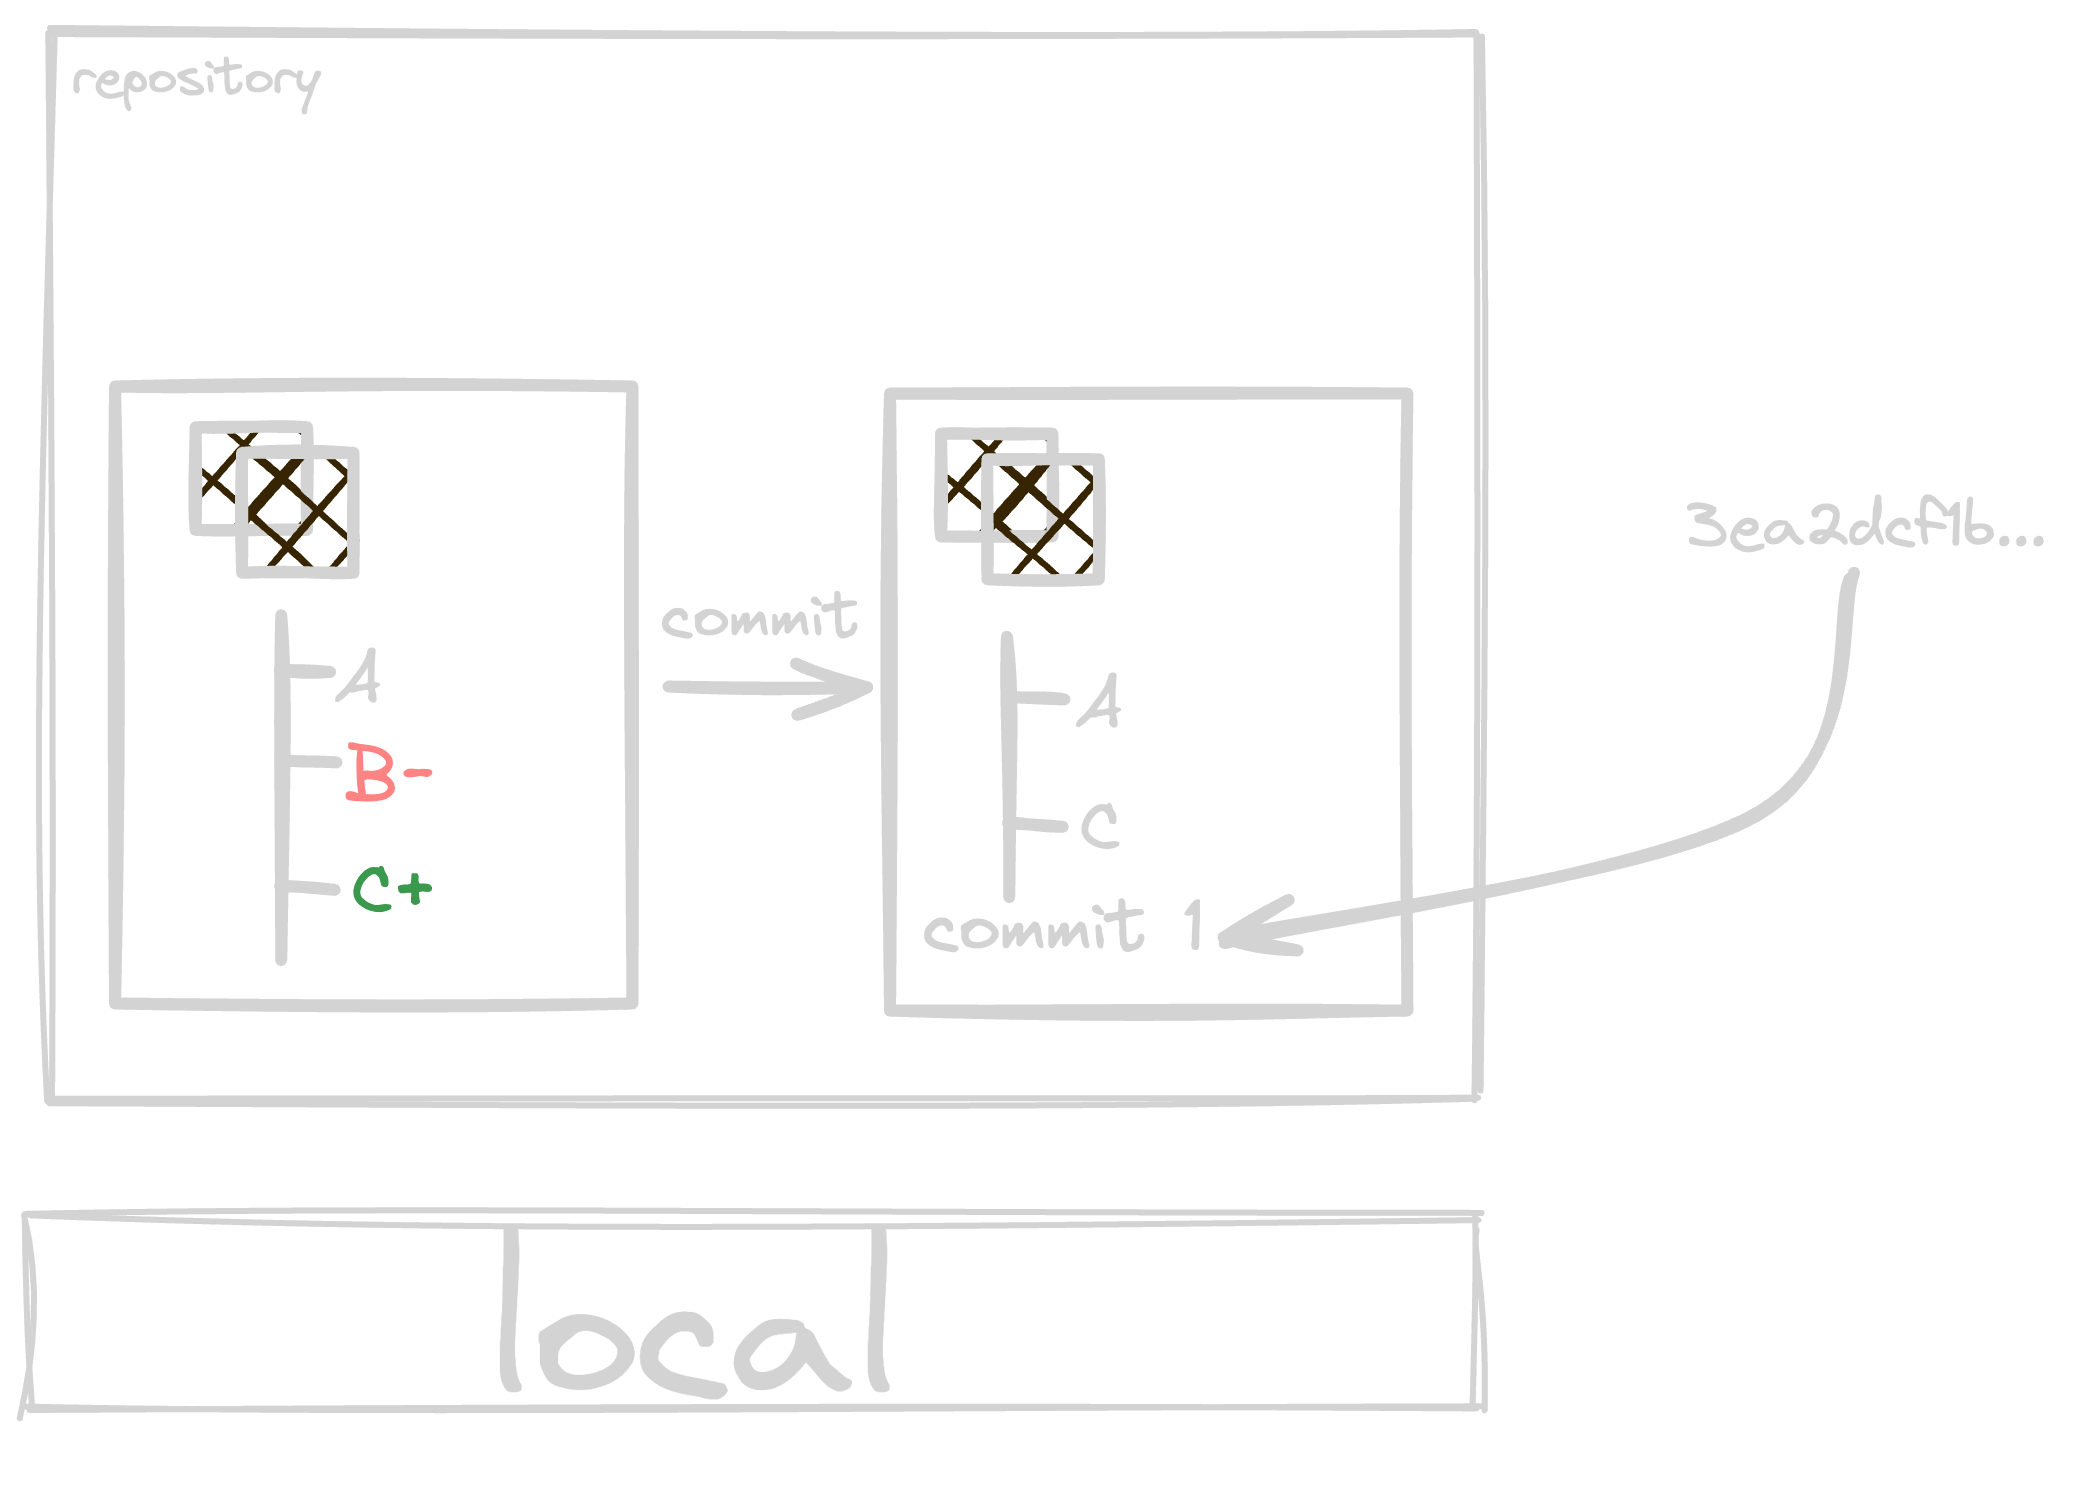
git commit -m "your commit message"The output will look something like:
[master 3ea2dcf] your commit message
1 file changed, 1 insertion(+), 1 deletion(-)-
To directly stage and make commit use
git commit -am "your commit message". -
The --amend option allows you to change your last commit. Let’s say you just committed and you made a mistake in your commit log message. You can conveniently modify the most recent commit using
git commit --amend -m "your updated commit message". -
If you forget to include a file in the commit, then you don't need to change the commit message just use the --no-edit option:
git add <missed-file>
git commit --amend --no-edit
Push
Pushing means sending your commits from your local machine to the remote repository (like GitLab or GitHub). It's like uploading your updated photo album to a cloud service.
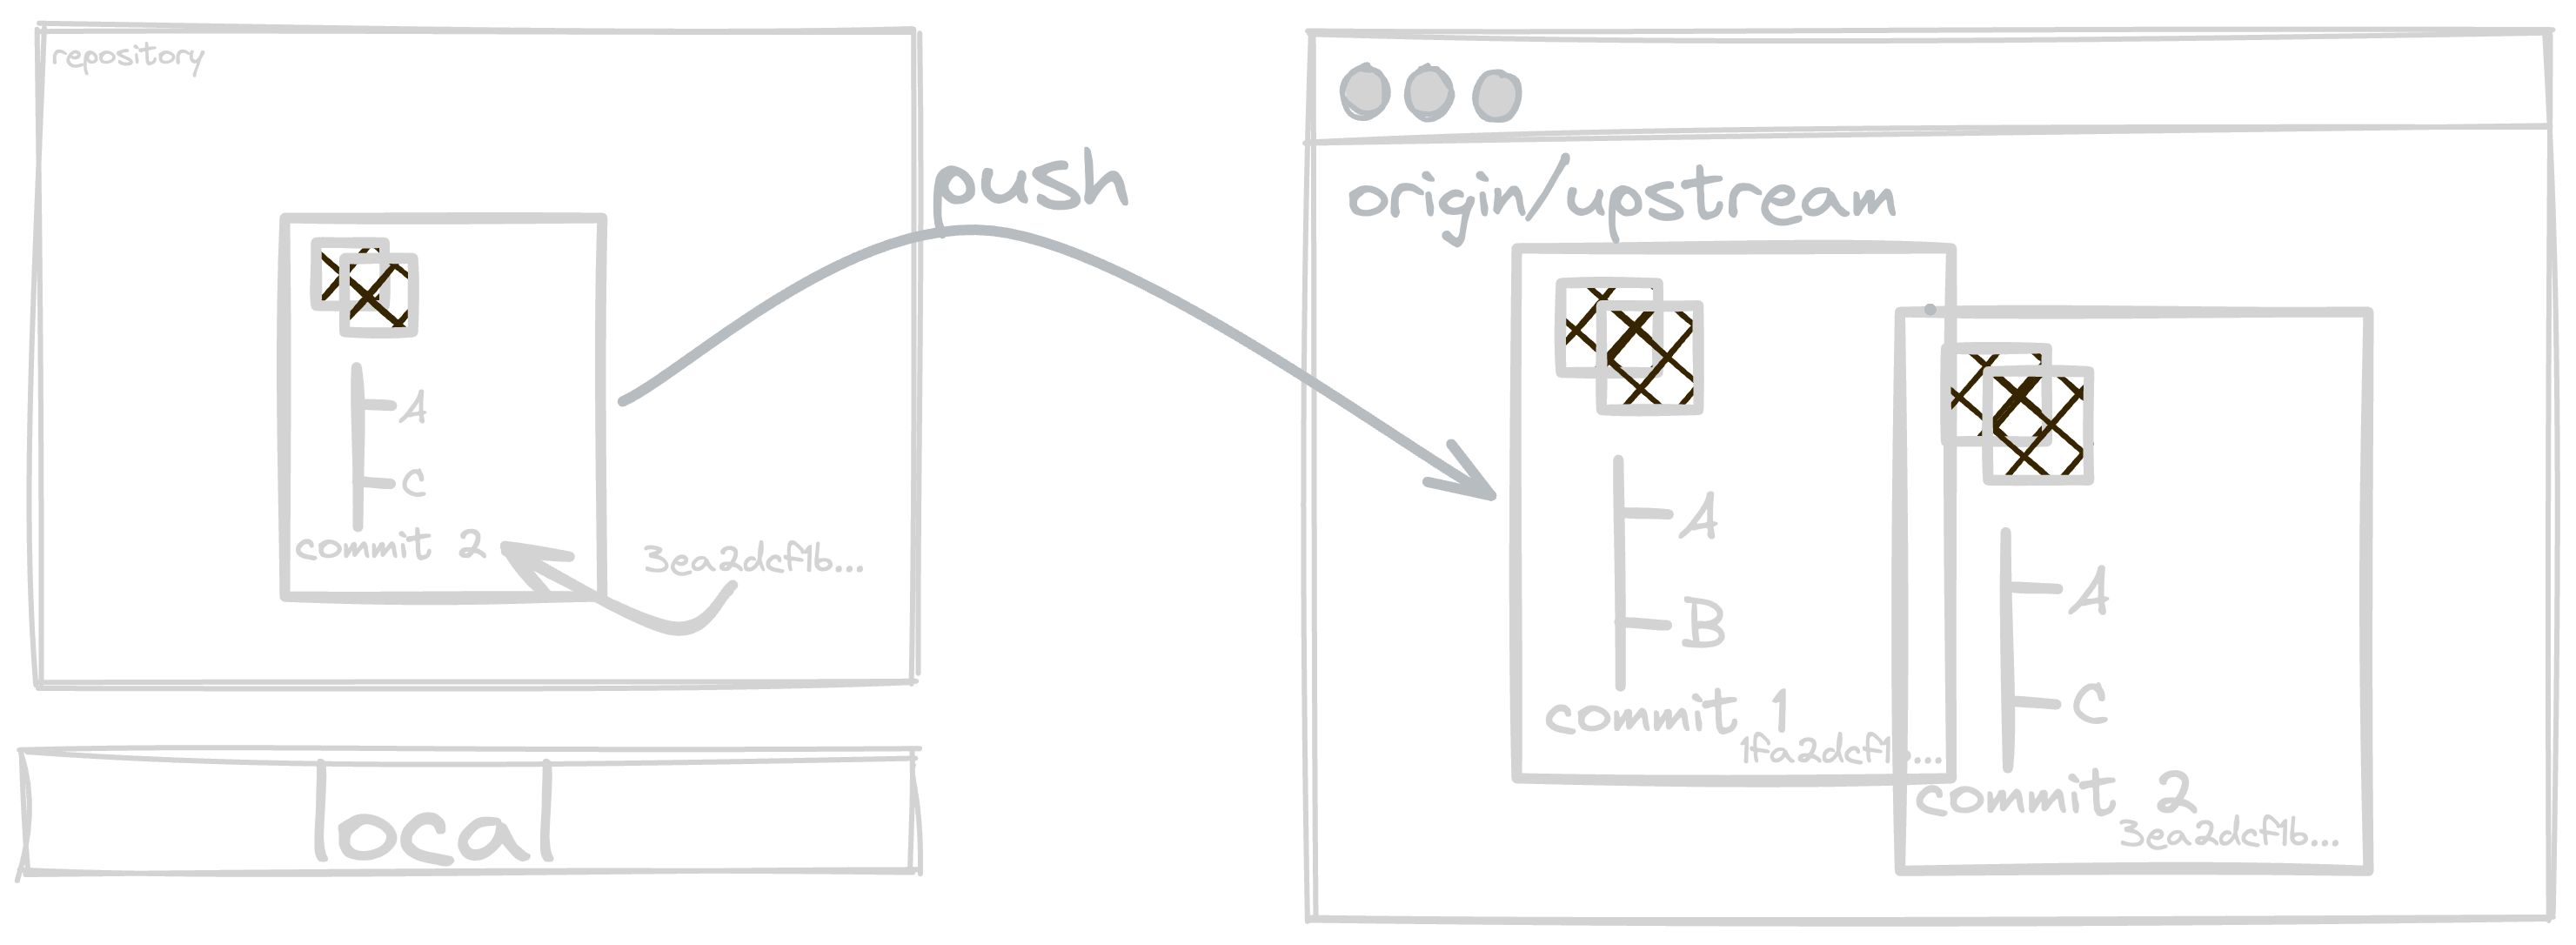
git push- If it's a new branch that only exists in your local and not on origin or upstream then
use have to use this command once
git push --set-upstream origin <new-branch>. Afterwards you can just usegit push.
if you don't want to do this everytime and instead just use
git pushthen you have to update your git config withgit config --global push.autoSetupRemote true.
Sync
Let's say you clone your fork repository and the upstream repository changed and you want to sync your repository on origin as well as locally. How do you that?
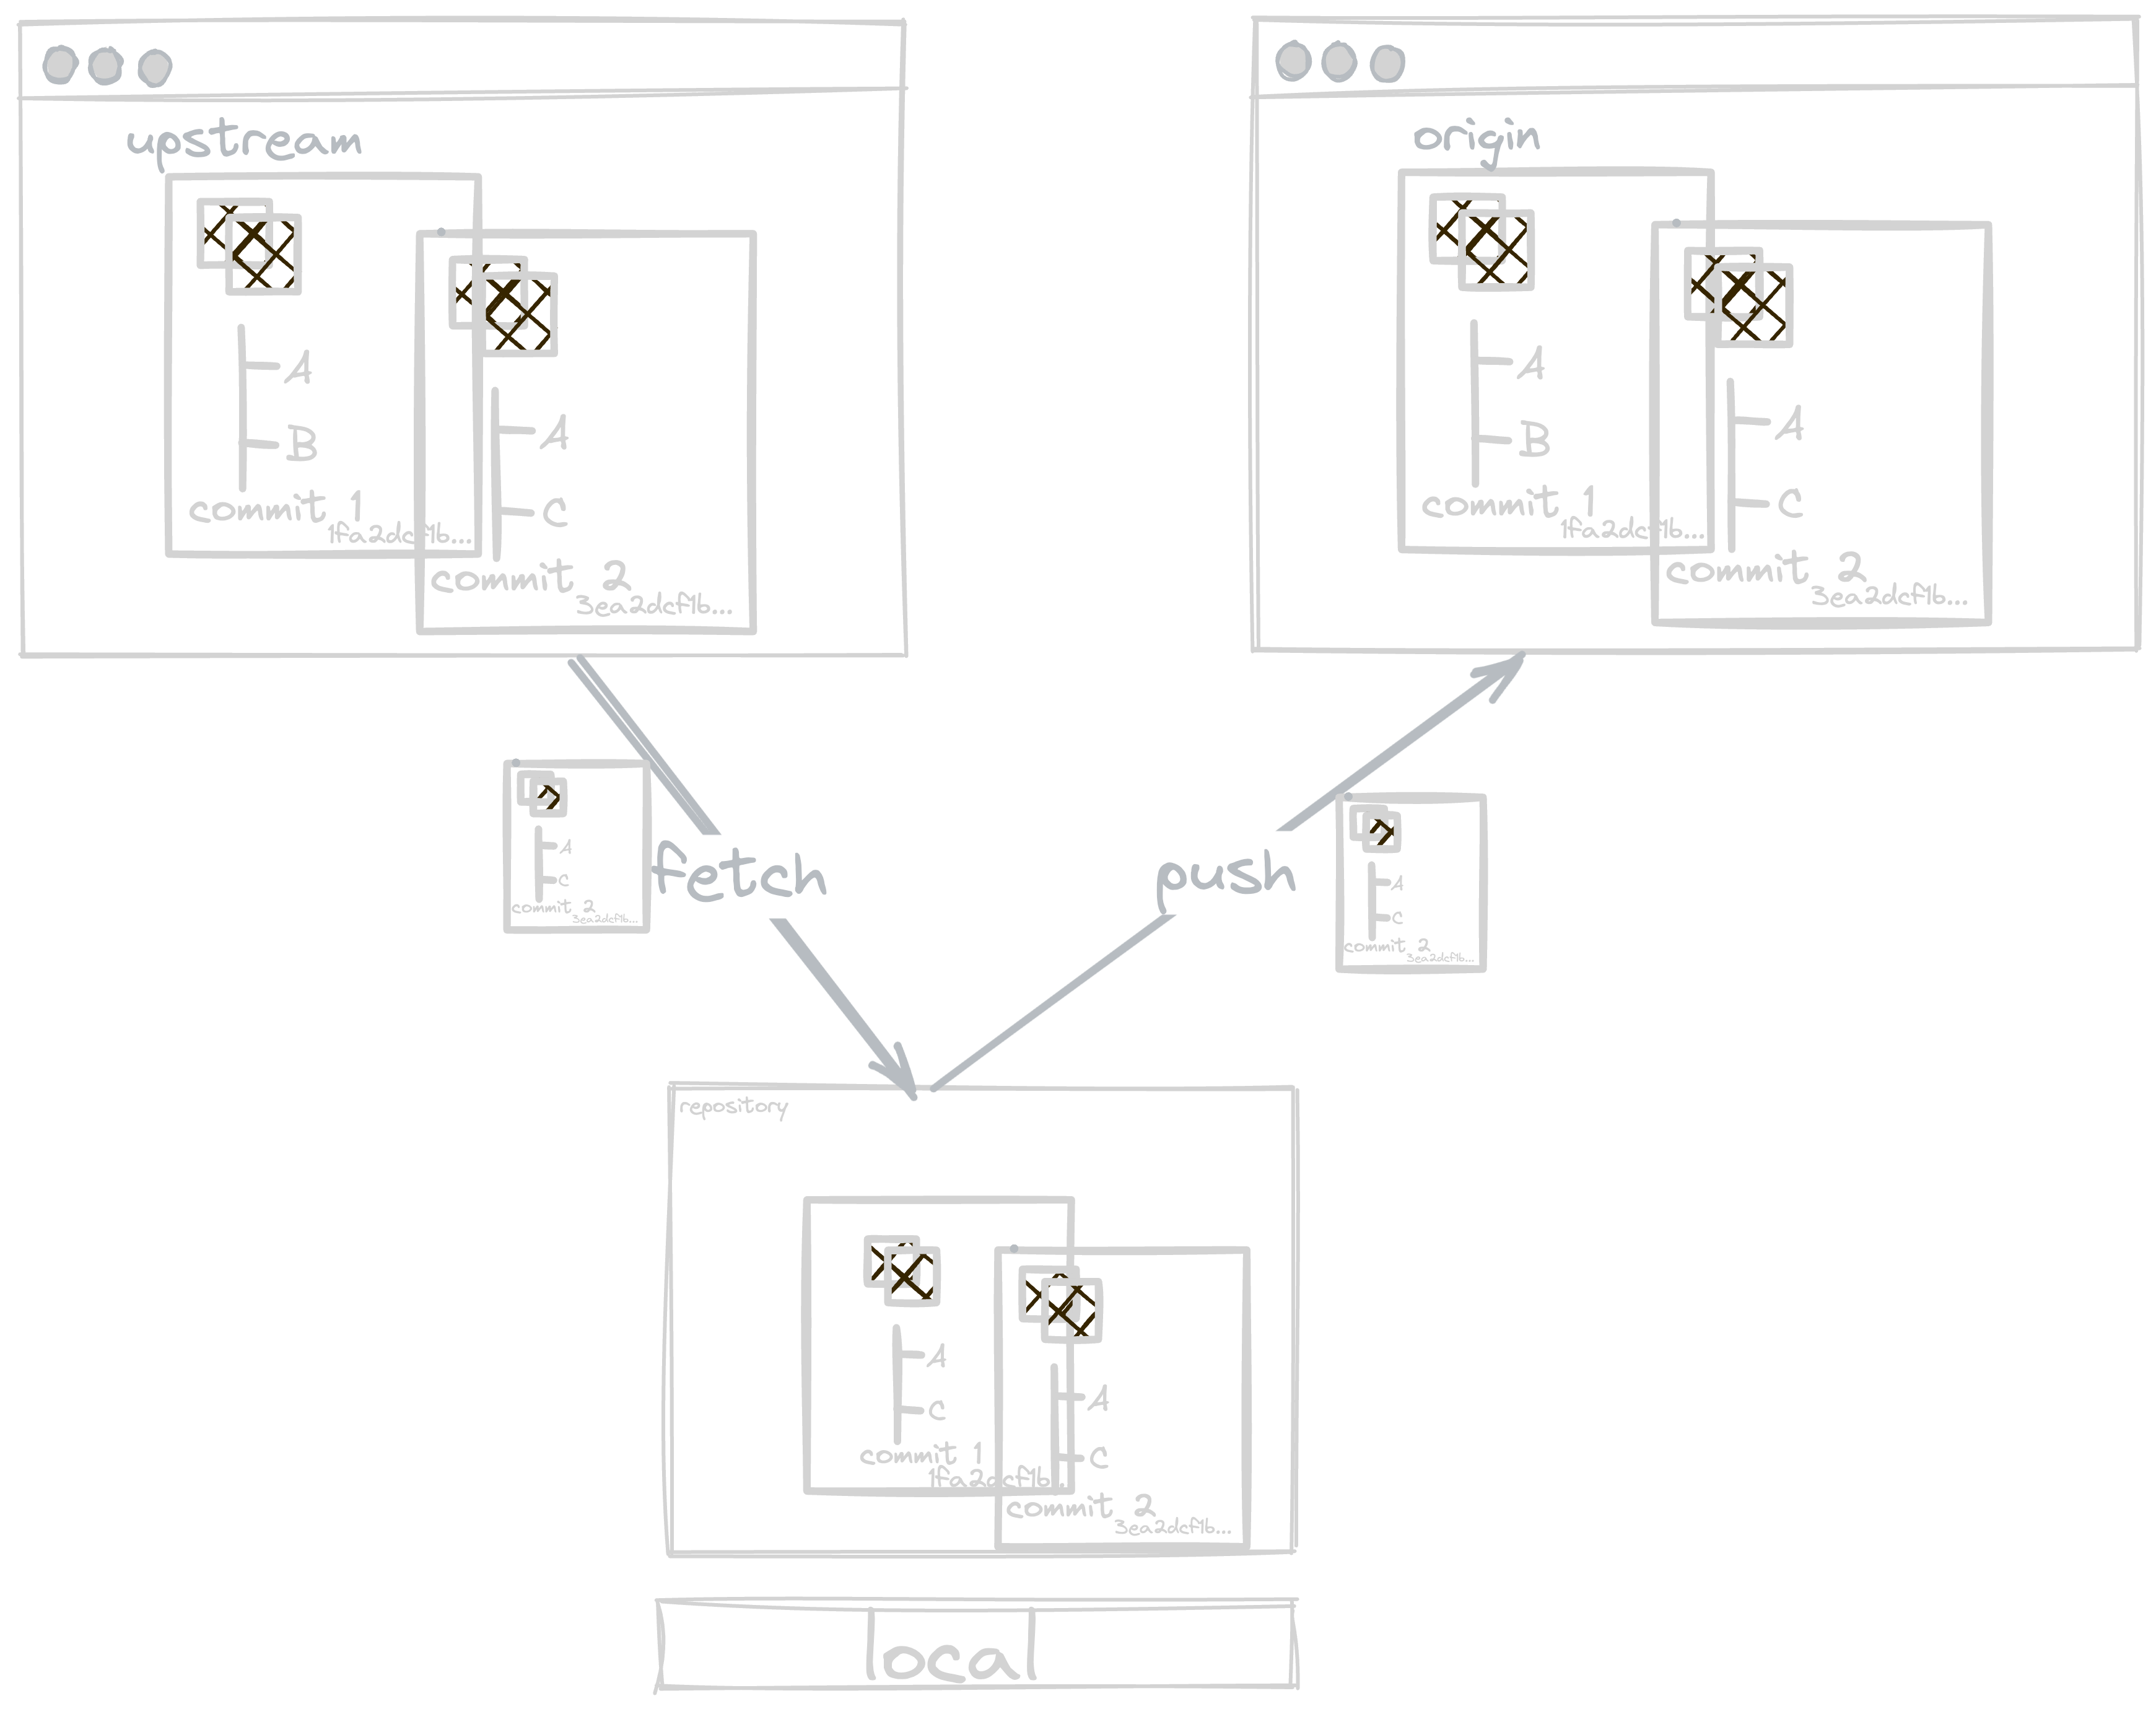
It's simple. This is my personal favorite.
In order to pull the changes from the original repository into your forked version,
you need to add the original git repo as an upstream repository. For that first we need to undrstand remote.
Remote references are references (pointers) in your remote repositories, including branches, tags, and so on. You can
read more about it here.
Check remote
git remote -vyou will see output like bwlow and notice that there is no original repository just the origin which is pointing to your fork:
origin https://github.com/[Your UserName]/[Your Fork].git (fetch)
origin https://github.com/[Your UserName]/[Your Fork].git (push)
Add upstream to your remote
git remote add upstream https://github.com/[Original Owner]/[Repository].gitIf you run the git remote command again, you will now see both origin and upstream are configured
git remote -vorigin https://github.com/[Your UserName]/[Your Fork].git (fetch)
origin https://github.com/[Your UserName]/[Your Fork].git (push)
upstream https://github.com/[Original Owner]/[Repository].git (fetch)
upstream https://github.com/[Original Owner]/[Repository].git (push)Fetch original repository
git fetch upstreamremote: Counting objects: 75, done.
remote: Compressing objects: 100% (53/53), done.
remote: Total 62 (delta 27), reused 44 (delta 9)
Unpacking objects: 100% (62/62), done.
From https://github.com/ORIGINAL_OWNER/REPOSITORY
* [new branch] master -> upstream/masterNote that commits to the original repository will be stored in a local branch called, upstream/master
Merge original repository to your fork
a. make sure that you are on your fork’s master branch.
git checkout masterb. merge the changes from the upstream/master into your local master branch. This will synchronize your fork's master branch with the upstream repository without losing your local changes. If there are any conflicts due to your changes, you'll need to resolve them before completing the merge.
git merge upstream/masterUpdating a422352..5fdff0f
Fast-forward
....Push your changes
git push origin masterSummarize
With the following 5 commands you can sync your forked repository with the original repository and push the changes.
git remote add upstream https://github.com/[Original Owner]/[Repository].git
git fetch upstream
git checkout master
git merge upstream/master
git push
Rebase
Git rebase is a command that allows you to integrate changes from one branch into another. It works by moving or combining a sequence of commits to a new base commit. This is especially useful for keeping a clean project history.
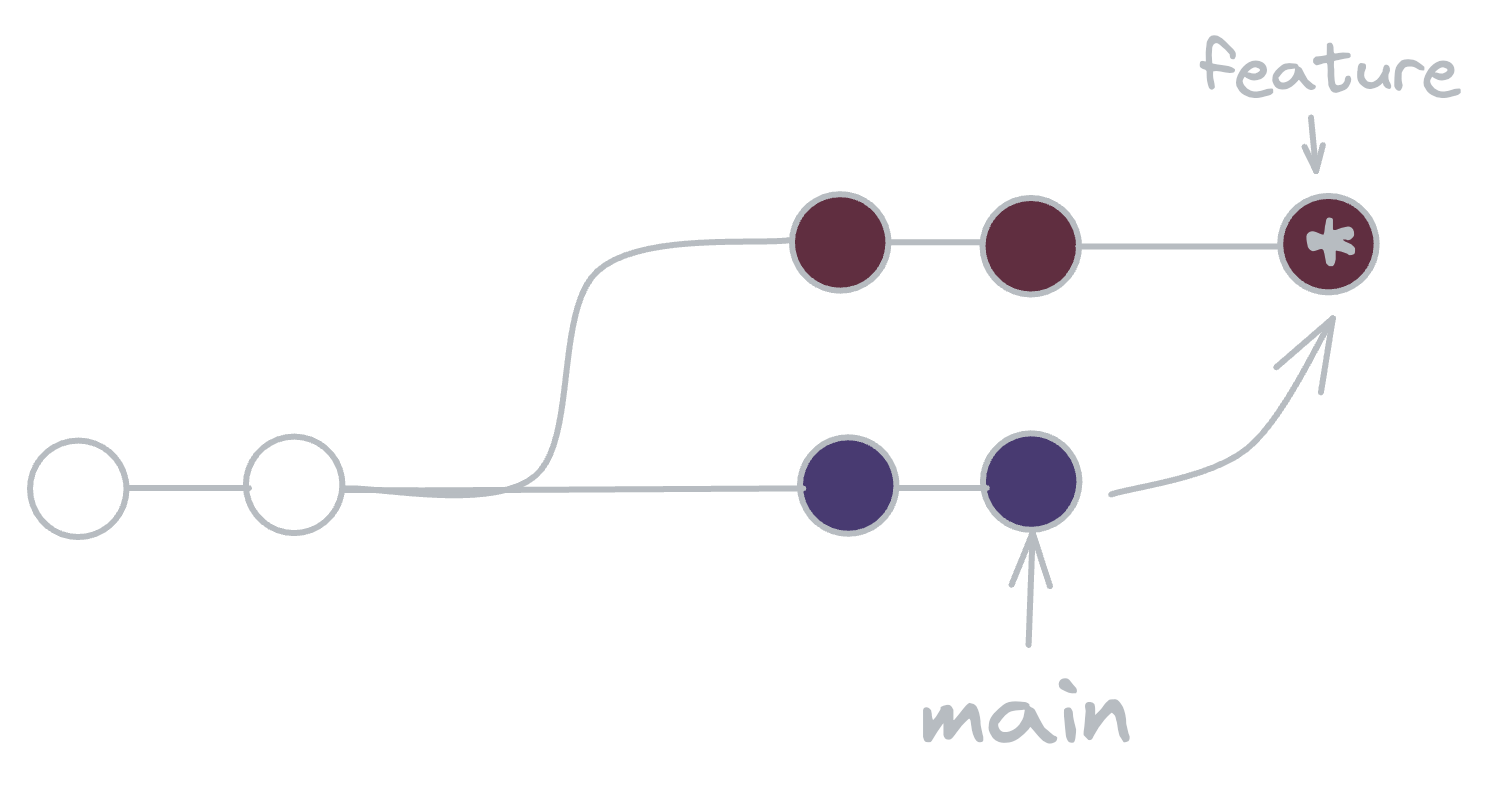
- Imagine you’re working on a new feature in a branch called feature-branch, and while you’re working, the main branch gets updated with new commits. You want to incorporate these updates into your feature-branch.
git checkout feature-branch
git rebase master- If you have
nnumber of commits on your branch and you want to squash those commits into single for keeping git history clean, you can do rebase interactive:
git rebase -i HEAD~nRebasing interactively means editing your commit history to make it cleaner. It's like rearranging the pages of your photo album.
Example:
let's say your branch has total of 5 commits and you want to squash into 1. How would you do it?
Well for that we have to use rebase -i and select the commits we want to squash.
git rebase -i HEAD~5you will see output like this:
pick cdd4b77 commit-message 1
pick 21429ec commit-message 2
pick 785ef0b commit-message 3
pick 794ea82 commit-message 4
pick acd4d61 commit-message 5

# Rebase 5f1fe21..acd4d61 onto 5f1fe21 (5 commands)
#
# Commands:
# p, pick <commit> = use commit
# r, reword <commit> = use commit, but edit the commit message
# e, edit <commit> = use commit, but stop for amending
# s, squash <commit> = use commit, but meld into previous commit
# f, fixup [-C | -c] <commit> = like "squash" but keep only the
now the top commit is the first commit and we want to squash all of them into one, to do that
change pick to s except the first one, like this:
pick cdd4b77 commit-message 1
s 21429ec commit-message 2
s 785ef0b commit-message 3
s 794ea82 commit-message 4
s acd4d61 commit-message 5

# Rebase 5f1fe21..acd4d61 onto 5f1fe21 (5 commands)
#
# Commands:
# p, pick <commit> = use commit
# r, reword <commit> = use commit, but edit the commit message
# e, edit <commit> = use commit, but stop for amending
# s, squash <commit> = use commit, but meld into previous commit
# f, fixup [-C | -c] <commit> = like "squash" but keep only the
save it and then a new popup window will open with commit messages where you can simply delete the commit messages and just keep one.
finally run:
git push --force-with-leaseDelete
Git will not let you delete the branch you are currently on so you must make sure to checkout a branch that you are NOT deleting.
git branch -d <branch-name>The -D flag, with a capital D (which is an alias for -- delete --force), forcefully deletes the local branch, regradless of its merged status.
git branch -D <branch-name>- you can also delete remote branch by using
git push origin -d remote_branch_name
Reset
Resetting means undoing changes in your project. Soft reset keeps your changes, while hard reset removes them. It's like using an eraser to either lightly or completely remove writing.
git reset --soft HEAD~n
git reset --hard HEAD~n
git reset --soft: The --soft aims to change the HEAD (where the last commit is in your local machine) reference to a specific commit.git reset --hard: This option has the potential of being dangerous. So, be cautious when using it. Basically, when using the hard reset on a specific commit, it forces the HEAD to get back to that commit and deletes everything else after that.
Use git reset soft if you want to purge your commit history but keep your index and filesystem unchanged.
Use git reset hard if you want to clear the index and revert all tracked files to their state at the reset commit.
If you have any questions or need further guidance on using Git, feel free to ask in the comments below. And don't forget to subscribe to my newsletter for more tips and tricks on becoming a better software engineer. Happy coding!